Restore files after a disaster
A set of instructions to get you recovered quickly and easily.

|
Restore files after a disaster
|
|
These instructions will help you to recover your computer after a disaster. Some of steps should be taken only in the event of serious trouble like a disastrous data loss due a physical hardware failure. To back your computer in working order you should:
Make sure the following items are available when needed for disaster recovery.
- An active Internet connection to connect to WestNet's backup server.
- A CD-R disc and a printout of instructions created from the Disaster Recovery CD image you prepared (optional, but recommended).
- Disks with repair information (optional, but recommended).
Find the CD-ROM included with your computer or the emergency recovery disk. Restart the computer and start it from recovery disk or CD. When you computer has started from this disk or CD, run CheckDisk or other disk repair utility to examine your hard disk for problems.
If you were able to repair all problems with your hard disk and no low-level problems are found, skip this step.
If your hard disk still has some problems but some files were repaired and you can access them, it's the best time to make a complete (full) backup of these repaired files. Use a new backup media as a destination for this Backup Set and do not encrypt your backup archives. You may want to make 2 separate full backups of all repaired files. When you are sure you have a redundant backup of your repaired files, use "Repair Wizard" to save files with repair information on a floppy or removable disk. If finally you were able to fix all problems with your hard disk, skip the rest of this step.
If you could not make any repair with the disk utilities or the hard disk still isn't accessible, you probably need to repartition and reformat it to prepare for restoration.
If you have a Disaster Recovery CD, you can restore your hard disk without formatting it and installing Windows and all other software. Insert your Disaster Recovery CD and reboot. If your computer will not start from the CD, you may need to change the boot order settings of your computer's BIOS. (Refer to the computer's documentation to change its BIOS settings to allow it to boot from the CD drive.)
The CD automatically starts WestNet Backup Recovery CD Console. This Console guides you through all steps to restore your computer. Use the instructions to restore your hard disk (The instructions are also saved on the root of the disc). If you were able to restore your hard disk with Disaster Recovery CD, go to paragraph 6.
If you haven't a Disaster Recovery CD, you have to repartition and reformat your hard disk. You should re-create all disk volumes as they were before. Use "fdisk" or other similar disk utility, but be very careful because it will destroy all data on the disk!
WARNING: Formatting a hard disk destroys all data stored on the disk. If you are not sure, do not format the disk.
If you have formatted your hard disk during the previous step, you have to install new Windows operating system on your newly-formatted hard disk. Restart the computer and install WestNet Backup. Use your registration key to register WestNet Backup again.
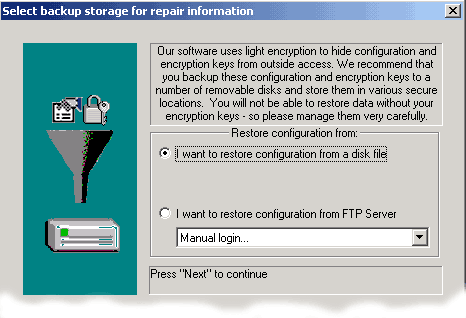
To start restore of your files you should to restore your Backup Sets, encryption keys and catalog files. Files with repair information contain all these items. That's why, you should use the Disaster Recovery Wizard at the File menu to restore them. Select "I want to restore my configuration and encryption key" option and press the Next button.
Select storage with repair files. It can be any disk or FTP Server. Press the Next button to proceed. If you restore your repair files from a disk, WestNet Backup will ask you to choose it and will find all repair files on it. You have to select one of them to restore.
No matter what storage you use for your repair information, you will see the following page as on the image below. You have to check all items.
Press the Finish button to restore the selected items. When the restore is finished, the Repair Wizard will be closed and you should see all your Backup Sets at the left docked panel.
Now it's time to check that all necessary items were restored successfully and to do something if some of them were not restored due any reason.
Item name How to check What to do if I can't find the item 1. Backup Sets The tree of Backup Sets (the docked panel at the left of WestNet Backup Explorer main window) should show all your Backup Sets. If you don't see all or any of your Backup Sets, you should to re-create them manually. The most important part is to specify the same Backup Set description and destination. 2. Encryption keys Open the Settings dialog box and activate Encryption keys page. You should see all necessary encryption keys. If you don't see all or any of your encryption keys, we can recommend you only one thing: try to restore most up-to-date repair information. You won't be able to restore encrypted backup archives without encryption keys!
To restore your files you have to have a tree of all backed up files. Repair information has a tree of backed up files which were backed up to moment of creation of the information. To have a tree of ALL files, you have to download catalog files (small files with list of backed up files). To do that, select a Backup Set and activate its Restore panel. Press Rebuild the tree from a backup media button and follow the instructions.
Now you are ready to start restore of your files, but lets do some check-ins to be sure in that:
- Your hard disk and Windows operating system are working again.
- WestNet Backup is working too.
- You see all your Backup Sets and backed up files at the "Restore" panel.
- You see all your encryption keys at the "Settings" dialog box.
Select a Backup Set with files you want to restore. Four tabbed panels ("Status", "Backup", "Restore" and "Logs") will appear at the information window. To restore your files you have to activate Restore panel. It contains the tree of all backed up files of the selected Backup Set (see image below).
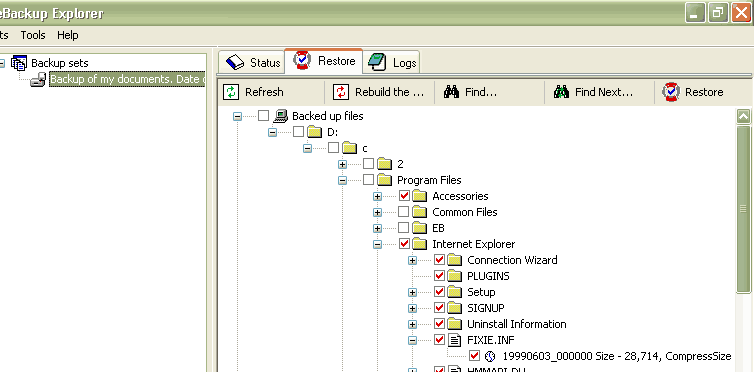
You have to select the files you want to restore (click on a checkmark near a file or a folder). If you want to restore all files and folders, do not select any files.
If you can't find the files to restore, you can use the Search commands to find them. Use Find... command at the Commands menu to find a file or a folder. Use Find next... command to find the next file or folder.
When all necessary files are selected, press Restore button to start the restore process. A Restore Wizard will appear. Walk through it without changing anything to restore the selected files to their original location.
After WestNet Backup is finished the restore process, exit WestNet Backup and restart the computer.
Now your computer is ready to use.